Yes, it's true. I'm finally making time (as I wait to take my parents to the airport - they're leaving a week before us to NY), to blog about the long anticipated wedding invitations. I think I've been talking about these invites since February, lol.


When I was asked to create these invites (some time late last year), I was absolutely flattered and honored. My niece and sister love the crafts I make and they admire all the work I do. I had no clue what style I wanted to make, but I did know the color and ingredients I wanted to use. It needed to be black, white and malibu (the color of the David's Bridal dresses). I wanted it to have bling and Wild Orchid Crafts flowers, and to be extremely elegant and unique. She (my niece Michelle), had asked to incorporate the damask print. So I started by purchasing a few damask background stamps and black embossing powder. Even with the embossing buddy, there were specs of black powder all around. And even though I knew I could cover it with ribbon and/or flowers, I surely didn't want to leave room for error. So I had to think of another way.
I sketched 3 different cards, and I surely thought my niece would pick the 2nd one. It was my favorite one. It was super easy for me to execute and extra fast.... which I loved!! haha... but she went with the third.
The first sample invite I made looked like this.

I wasn't too happy with it. As you can see the initials were embossed, the background was embossed, and it didn't look as "polished" or "classy" as a wedding invitation requires. So I went back to the drawing board and this time I incorporated the help of my husband's digital and graphic skills.

The second sample invite I made looked like this.
I love it so much that I think I can make these in many colors and sell them in my Artfire Shop.
I love it so much that I think I can make these in many colors and sell them in my Artfire Shop.

I was very excited to see how together and elegant it looked. I loved the fact that I was able to design these with the help of hubby and print them out. It was my favorite by far, but I did promise to make my niece 3 samples, so I went right back to my creative quest on the search of an even more detailed and complex invite.

Here is the one she selected... and if you continue to read, you'll see exactly how I made them. =)

Starting with a sheet of 12x12 Recollections black cardstock, I cut that down to measure 10x6 inches.

Since half of 10 (which is the width I cut it down to) is 5. And half of 5 is 2.5. This is where I needed to score both ends of the width of the black cardstock at 2.5" in, to create the gatefold.


I secured that fold with my bone folder.

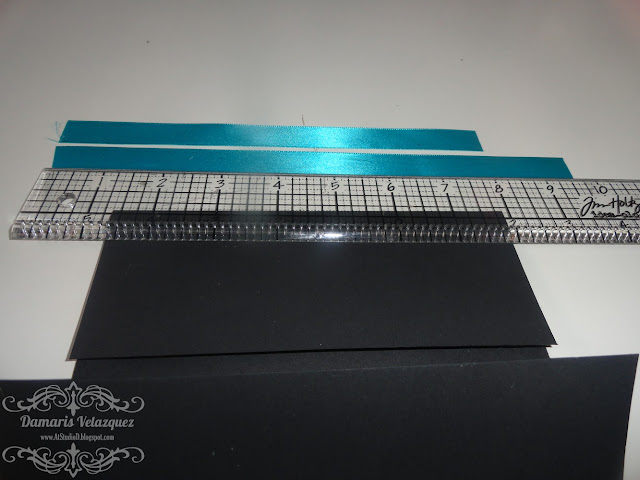
I found this perfectly matching ribbon at Jo-Ann. They were priced at $3 each and I purchased the last 4 of them. I was soooooo excited to have found it because after my first design (which was a different "aqua blue"), and after my hubby took an exact sample color of the Malibu from David's Bridal, the original ribbon I purchased no longer matched. So I was able to find this one at Jo-Ann.
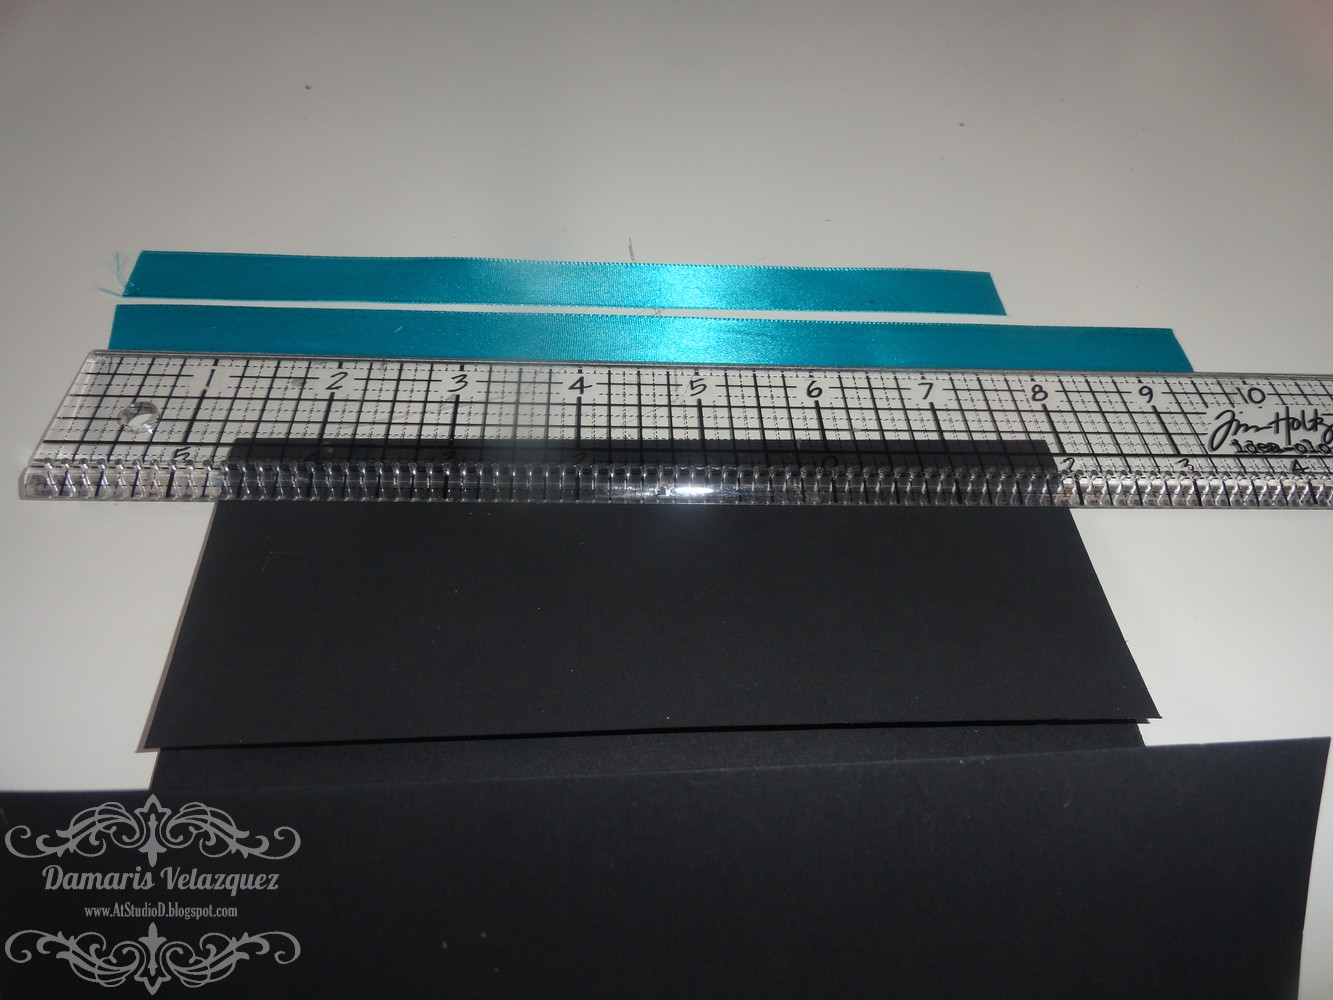
I cut the ribbon down to 2 different sizes.
1 - the bow would be tied on the right side of the card.
2 - I wanted to save ribbon, just incase I ran out.
1 - the bow would be tied on the right side of the card.
2 - I wanted to save ribbon, just incase I ran out.

I glued both pieces of ribbon to the center (eyeballing it) of the card, making sure that I left the longer ribbon on the left side because it needed to be long enough to reach over to the right side, where the bow would tie.

The damask background that my husband & I designed and printed did take a few tries to do. I kept changing the layout, and the border, and the width of the "malibu" thickness, but finally got it after 382 attempts...lol JK!!
We set it so that the background printed 2 per sheet and I was able to use a paper trimmer to cut them down to size and then cut them down the middle. Doing a gatefold card sometimes requires you to do a mirror image (left and right side). This was the easiest way I found to do so.

Using tacky glue (which I wasn't too fond of, but it was more affordable than getting Tombow Mono Adhesive - my favorite), I glued down both background damask pieces over the ribbon; making sure that they were aligned with each other and also with the edges of the card base.
I didn't want them to look lopsided or uneven.
I didn't want them to look lopsided or uneven.


I added glue to the back of the left-sided ribbon piece and wrapped it around the front of the card to make sure it doesn't lift up as I was trying to decorate the front and adding the final touches.


The monogram (although I wanted them to be created with stamps and embossing powder), ended up being designed with software by hubby (again), printed, and cut down. I think it measures 2x3". The black border you see is also printed. I added thicker dimensionals than I'm used to using (I love the ones Stampin' Up makes), because I needed more coverage behind the monogram and I needed it to be lifted off the card a little higher, to keep up with the dimensional flowers.
In the photo above, you can see that I only placed 1 dimensional on the very left of the monogram piece... the piece that would be sticking to the left side of the gatefold. Normally I'd place 2, one on each side, but I needed both flaps to open easily and without sticking. Duh, right?? lol

Once the hardest part was done, I was able to put all the cards to the side and create an assembly line. Something I learned from my hubby. He's an expert at creating assembly lines at his job. =)


All the flowers, sprays and bling had already been prepped days before. I sprayed all the blue flowers first with 2 different Tattered Angels Glimmer Mist colors (that I don't recall now... I will update the blog post when I'm home with the actual colors)... I then sprayed everything (even the white ones) with Lindy's Scintilating Silver Glitz Spritz spray and let them dry overnight.
[NOTE: If you are pressed for time you can use your heat tool, but I've had bad experience using those on flowers, they somehow end up looking wilted and even still stay wet.]
After they were dry, I used a thin bamboo stick to curl the straight ends.


Incidentally, all the packaging that the Recollections bling came in was perfect to re-purpose and use to package other things that I might be sending to friends. I just cut off the tops and left the "sewn" divider as the closure. Neat!!

I started by adding the white Gypsophila WOC spray to the far left of the monogram. These are my favorite sprays to work with, especially for cards. They are so pretty and delicate. =) I always purchase at least a pack of these when I order from Wild Orchid Crafts.
NOTE: Gypsophila sprays are no longer sold on the WOC site. I'm so sad!
NOTE: Gypsophila sprays are no longer sold on the WOC site. I'm so sad!

With hot glue, I then added the largest blue mulberry flower from WOC, followed by the first 2 pieces of bling that I cut.


I then added the white medium sized WOC white mulberry flower above the blue flower,
and in between the gypsophila spray.
and in between the gypsophila spray.


And the last flower to add was the small blue WOC mulberry flower, which I placed above the white flower, and closer to the monogram piece. Then finished it off with another piece of bling.


The inside of the invite (the actual wordage) was also created digitally, printed and cut down.
I glued that down with tacky glue.
I glued that down with tacky glue.


Once everything was dry, I flipped the invite up side down; because for some reason it's easier to tie a straight bow/knot that way for me. hehe...

This is what the trunk case full of invites looked like. I made a total of 35. A 6 month long project that gave me stress and headaches, was finally complete. I was so nervous and full of anxiety about these invites that there were nights I didn't sleep worrying about them. SERIOUSLY!! LOL... I wanted them to be beautiful and classy, and I was happy to finally be done with them.
I shipped them to her the first week of April and they were distributed in June.
I shipped them to her the first week of April and they were distributed in June.


We also made the RSVP cards to fit some black envelopes that I purchased at Michaels,
and to match the invitations...
and to match the invitations...
MY HUBBY IS AWESOME!!

I realize that this blog was very long, but I wanted to be extremely detailed in this post. Because there are times that I get messages with questions and I sometimes forget to reply to them. I hope you were inspired and will use any and all of the information I shared to create your very own special wedding invitations.
Thank you in advance for your comments and I'll see you back here next time for another project share.
P.S. I will update this blog again in a few hours or over the weekend add any missing informatione.
x0, Damaris


4 comments
Wow, Damaris!!! These are truly stunning, gorgeous, amazing and beautiful. I love every little detail on them but the colors are exquisite. You really did such an amazing job on them and I know you must be glad to have them all complete. Job very well done D !!!
You did a fantastic job on these girl. (Oh and hubby too hehe).
Could you tell me what the color was that you used for the Malibu trim on the paper? I am trying to match my color to that Malibu and am having trouble finding what shade it is! Thanks!
Hello Damaris!
First and foremost I want to say that your invitation is beautiful!! I have been trying to find the black and white print you used for days now is there any way you could email it to me or let me know how you created it? my email is daisyloera@g.ucla.edu. Thank you so much and God bless you and your family.
Post a Comment